Neutrons
Helmholtz-Zentrum Hereon Outstation at FRM II
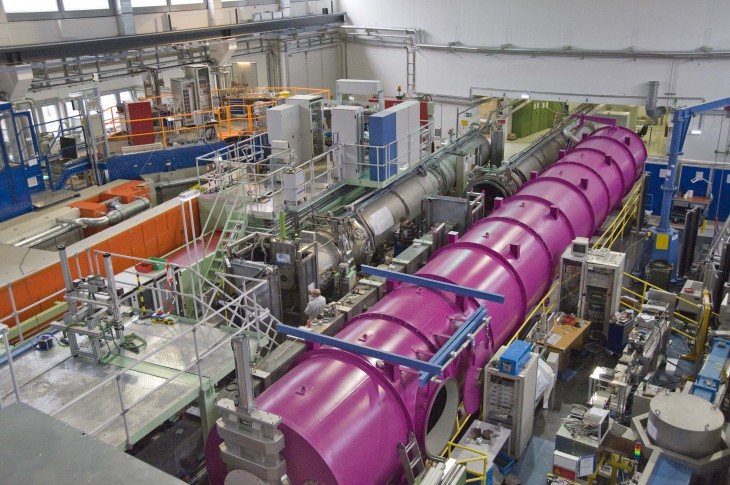
Instruments in the Neutron Guide Hall at the FRM II
At the Helmholtz-Zentrum Hereon outstation at the Heinz Maier-Leibnitz (FRM II) reactor in Garching near Munich, Helmholtz-Zentrum Hereon operates three outstanding neutron scattering instruments. The small-angle scattering and reflectometry instrument REFSANS is suited for measurements of solid samples as well as of air-liquid interfaces using a broad range of the scattering vector. Helmholtz-Zentrum Hereon also contributes to the operation of the SANS-1 instrument at FRM II together with the Technical University of Munich (TUM). Furthermore, Helmholtz-Zentrum Hereon is running the texture projects at the residual stress and texture instrument STRESS-SPEC, operated by TUM and Helmholtz-Zentrum Hereon/TUC.
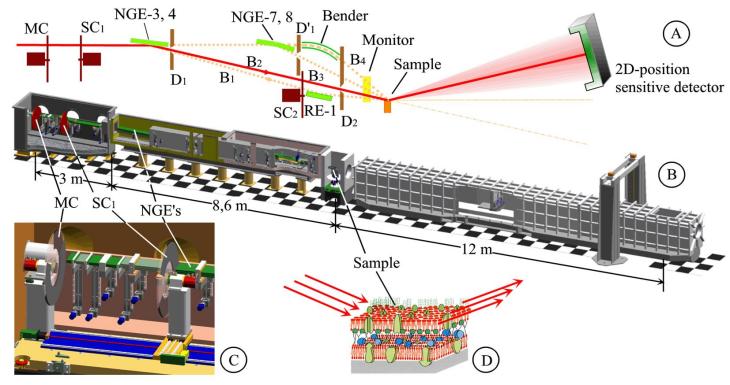
Fig. 1: Schematic view of REFSANS
REFSANS has been designed as a reflectometer for measuring both specular reflectivity and grazing incidence small-angle neutron scattering from solid samples as well as from the air-liquid interface.
These requirements are met and optimum measurement conditions are provided by its novel design:
REFSANS is located at the end position of the tilted neutron guide NL-2b at FRM II providing a broad cold neutron beam with a width of 170 mm and a height of 12 mm.
The instrument is designed as a ToF reflectometer (Fig. 1) in order to cover a huge range of momentum transfer with only a few instrumental settings (air-liquid interface).
The three double disc choppers allow performing measurements with high and low wavelength resolution to cover the demands of high resolution reflectometry (Dλ / λ ~ 1%) as well GISANS investigations ( Dλ / λ ~ 10%). The chopper further allows inelastic measurements and setting the wavelength range to be used to optimize the chopper transmission.
The neutron optics of REFSANS comprise neutron guide elements with different channels and special apertures to provide, on the one hand, slit-height smeared beams for conventional reflectometry and, on the other hand, point focussed beams for GISANS measurements.
In order to increase the beam intensity in GISANS geometry, a radial collimator is used to let up to 13 incident beams impinge on the sample with their reflections converging at the detector plane at a distance of ~ 9 m from the sample. A 2D-positon sensitive detector with an active area of 50 cm × 50 cm, a spatial resolution of 2 mm × 3 mm, a very low γ-sensitivity and a maximum global count rate up to 106/s can be set at distances between ~ 1.5 m and 12 m from the sample.
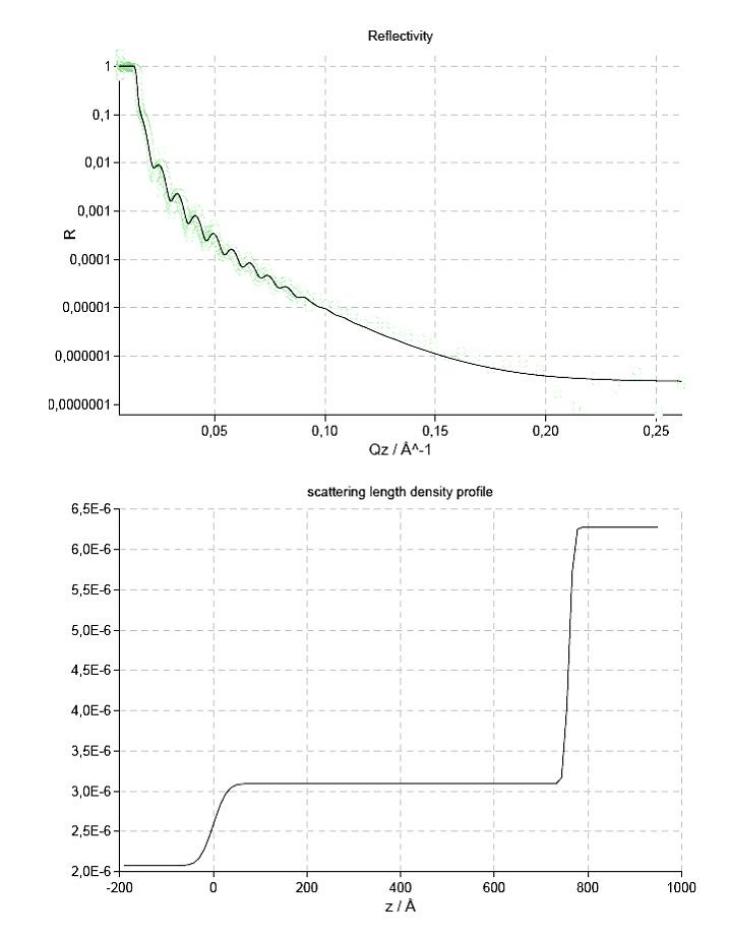
Fig. 2: Reflectivity and density profile of a Si-wafer with a ~ 75 nm thick oxide layer
The specular reflectivity from a fluid cell measured at REFSANS demonstrates that REFSANS allows high resolution measurements covering large ranges of momentum transfer and reflectivities (Fig. 2) with further room for improvement.
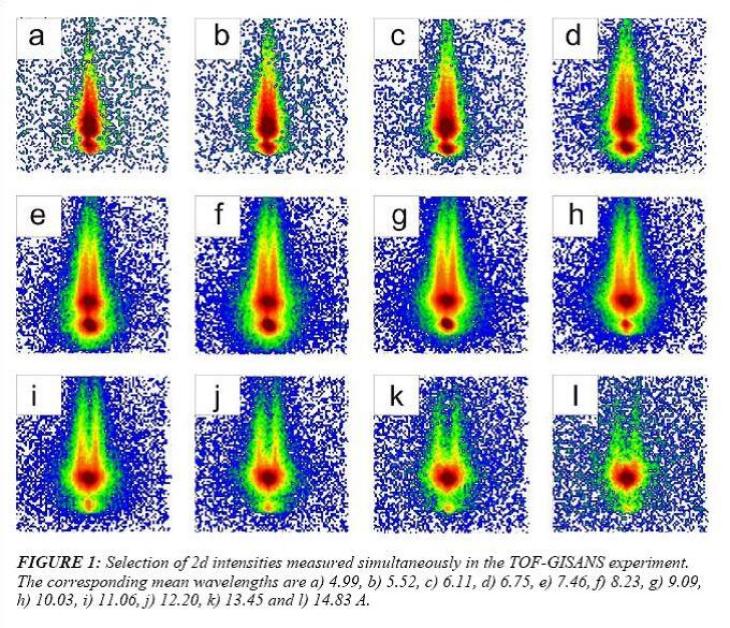
Fig. 3: TOF GISANS Scattering Patterns
By means of GISANS-measurements, lateral structures of extremely small amounts of surface material can be derived from measurements at REFSANS.
As an example Fig. 3 shows GISANS data from a surface layer with thickness of only 3.1 nm corresponding to a mass of the layer of only ~ 4 × 10⁻⁹ g. A sample goniometer is available at REFSANS which can be loaded with sample environments up to 200 kg or a large Langmuir trough. Polarized neutrons are available at REFSANS since 2010.
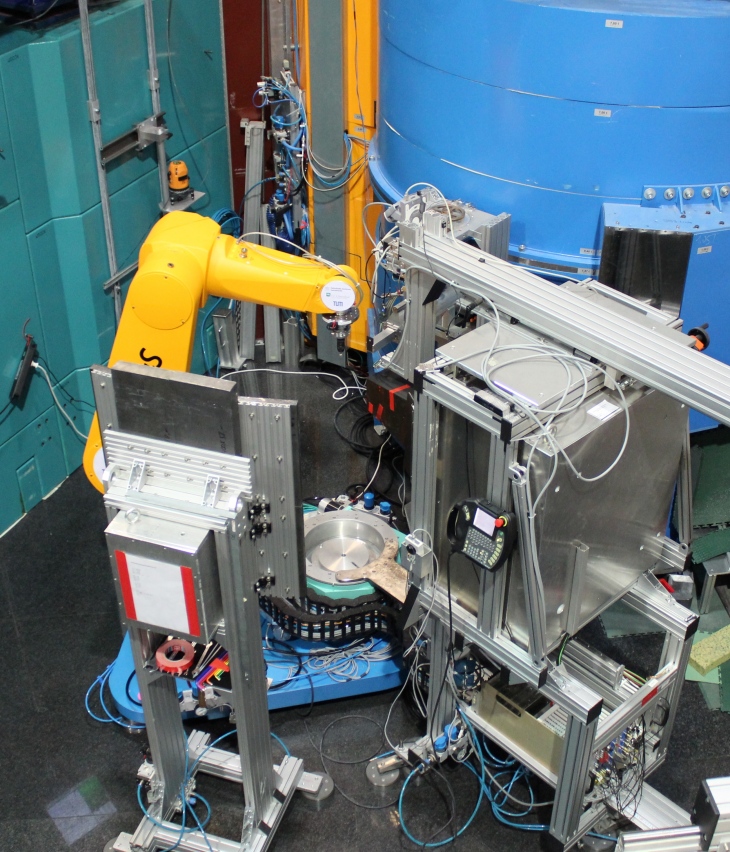
Fig. 1: STRESS-SPEC instrument at FRM II
Helmholtz-Zentrum Hereon contribute with their texture competence to the operation of STRESS-SPEC at the FRM II together with TUM. STRESS-SPEC is unique in its capability for strain and texture measurements with high local resolution on large volume samples and components.
The determination of the local variation of texture for example by inhomogeneous deformation is very important, due to the coherence between the texture and the physical and mechanical properties of materials. Therefore, a new measurement technique for local texture analyses with neutron radiation was developed. First measurements of local texture [1,2] have shown that the established method of strain measurement with neutron radiation at STRESS-SPEC [3-4] also provides a good basis for local texture analysis. Due to the flexible configuration it is possible to reduce the data acquisition time for every local pole figure down to 5 hours.
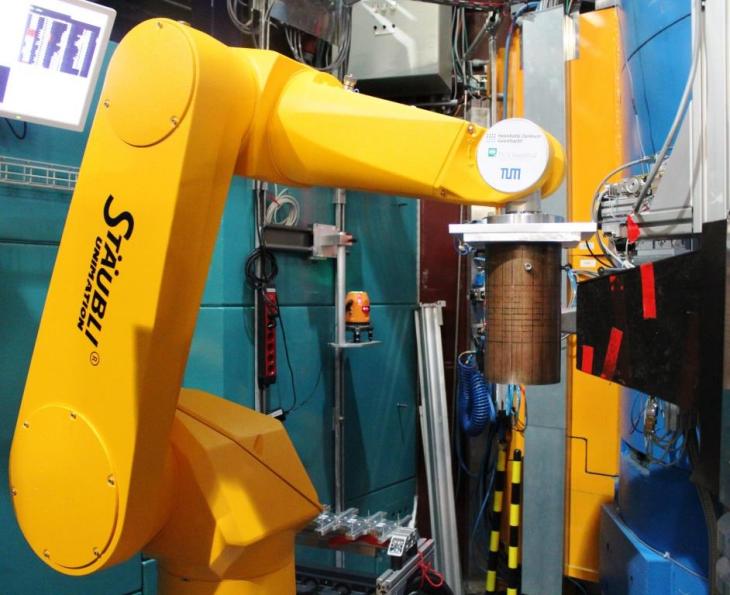
Fig. 2: Local texture analysis of a heavy Cu tube (~12 kg) with the robot system
Funded by the BMBF Verbundforschung project, the existing Eulerian cradle, which is limited in sample size and translation, has been replaced by a more flexible robotic system (Fig. 1). The robot can be used simultaneously for automatic sample manipulation and sample change. It allows faster alignment and positioning of larger samples (Fig. 2). In addition, the robot system offers a combined measurement of local texture and strain mapping, and as well more flexibilities for texture analysis under different environments (e.g. electic field).
To improve the current absolute positioning accuracy of the robot, the existing laser tracker system will be implemented, which involves the development of new laser reflection units for general usage. With the success of this laser tracker implementation, the robot can be provided as a standard setup either as at present for bulk and local texture analyses or in the future for strain scanning of conventional and complex samples. Furthermore, with the installation of event mode based readout of the detector, the data acquisition would be state of the art. It would benefit the texture measurements as they could be done in a continuous scanning mode as well as in-situ experiments like phase transformation kinetics and similar experiment as using the planned dilatometer.
References
- [1] Brokmeier, H.-G.; Gan, W.M.; Randau, C.; Voeller, M.; Rebelo-Kornmeier, J.; Hofmann, M.: Texture analysis at neutron diffractometer STRESS-SPEC. Nuclear Instruments and Methods in Physics Research A642 (2011), 87-92.
- [2] Garbe, U.; Hofmann, M.; Brokmeier,H.-G.: Stress and local texture measurement at the materials science diffractometer STRESS-SPEC at the FRM-II, Z. Kristallographie Suppl. 26 (2007), 171-176.
- [3] Hofmann, M.; Schneider, R.; Seidl, G.A.; Rebelo-Kornmeier, J.; Wimpory, R.C.; Garbe, U.; Brokmeier, H.-G.; The new materials science diffractometer STRESS-SPEC at FRM-II; Physica B: Condensed Matter 385-386 (2006), 1035-1037.
- [4] Hofmann, M.; Seidl, G.A.; Rebelo-Kornmeier, J.; Garbe, U.; Schneider, R.; Wimpory, R.C.; Wasmuth, U.; Noster, U.; The new materials science diffractometer STRESS-SPEC at FRM-II, Materials Science Forum 524-525 (2006), 211-216.
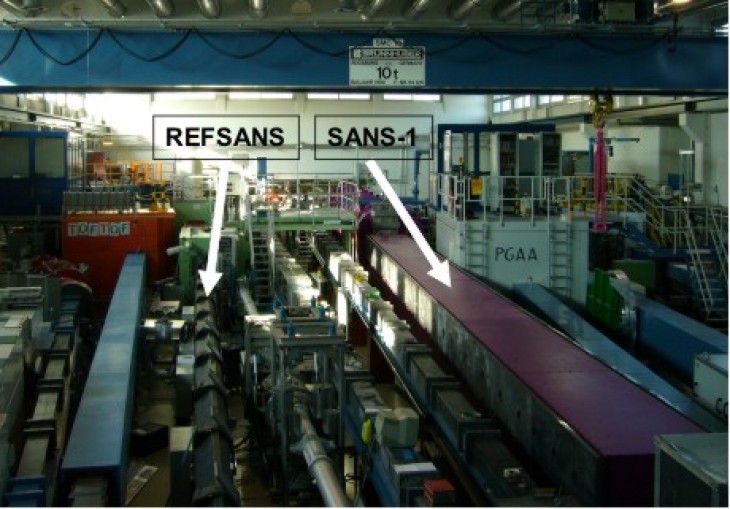
Instruments in the Neutron Guide Hall at the FRM II
Helmholtz-Zentrum Hereon designed and built the new small-angle scattering instrument SANS-1 at FRM II in co-operation with Technische Universität München.
The instrument is linked to the cold source of FRM II by an s-shaped neutron guide which lifts the beam height from ~ 1.2 m to ~ 1.5 m over the floor and acts as a strong filter of fast neutrons and hard X-rays from the reactor. At the exit of the neutron guide, velocity selectors with resolutions of 10% and 5% are available for monochromatizing the neutron beam with a maximum size of 50 mm × 50 mm.
Covering a length of 20 m, the collimator offers different options of setting the primary beam with high or low divergence for analysing samples in classical transmission or in grazing incidence geometry.
Around the sample position, free space over a length of ~ 3 m in beam direction can be made available for using different sample environments. All components in this area are made of non magnetic materials for the use of superconducting magnets.
A 2D-position sensitive detector with an active area of 1 m × 1 m and a position resolution of ~ 8 mm × 8 mm made of an array of position sensitive detector tubes with a diameter of 8 mm can be set at distances from ~ 1 m to 20 m from the sample. Each tube allows a maximum count rate of more than 105/s resulting in a maximum global count rate of ~ 5 × 10⁶/s. The centre of the detector can be moved horizontally by ~ 50 cm perpendicular to the beam direction and rotated around a vertical axis to cover areas of large scattering vectors.
Transmission polarizers in front of the collimation allow using all beam configurations optionally with polarized neutrons, and polarization analysis will be performed by means of 3He-filters. Due to being stationed at the high flux reactor FRM II, its design and its various components, SANS-1 at FRM II is one of the leading SANS instruments in the world.
For improving the time resolution of in situ investigations covering large areas of scattering vectors, a chopper device similar to that of REFSANS as well as a second 2D-detector can be integrated in SANS-1 in future.
SANS-1 at MLZ
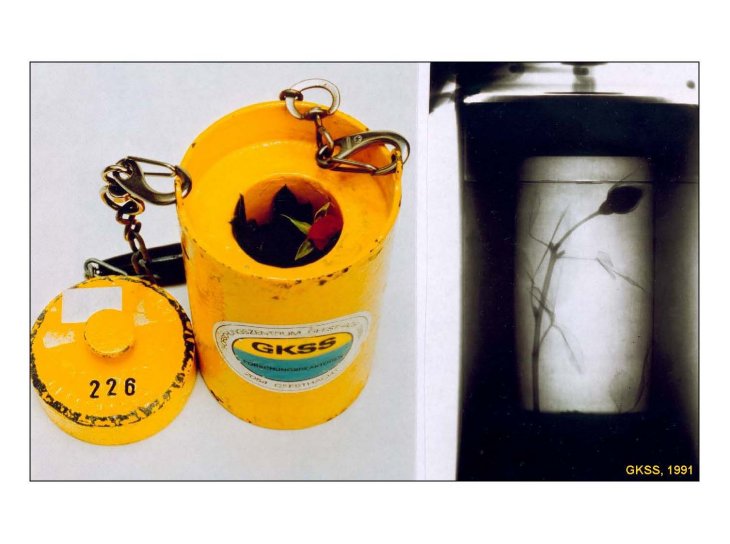
Neutron radiography of a rose in a lead box
In the future, Helmholtz-Zentrum Hereon will continue the Neutron Radiography and Tomography activites at the Helmholtz-Zentrum Hereon outstation at the FRM II in Garching.
Presently negotiations take place about the details of the Helmholtz-Zentrum Hereon engagement.


